How to Use Scrivener for NaNoWriMo — Guest: Gwen Hernandez
For the past several years, the Scrivener drafting program has been one of the sponsors for NaNoWriMo and offered deals to participants. Beyond the “try free for 30 days” version anyone can grab off their website, NaNo participants usually get 20% off and winners often get 50% off a full license.
In fact, that’s how I first started using Scrivener. The year I first participated in NaNo, they offered a special NaNo version of the software, programmed to expire after NaNo and preset with the 1667-words-a-day/50,000-words-for-the-month target. Then after I “won” NaNo, I purchased the software to keep.
So it’s not surprising that many writers use Scrivener for drafting their stories, especially if they’re participating in NaNoWriMo. The program is great for tracking daily word count and inspiring us to hit targets.
How can @ScrivenerApp help us during #NaNoWriMo? @Gwen_Hernandez shares her tips. Click To TweetHowever, one of the main complaints about Scrivener is that it’s not always intuitive to learn. I actually read the whole tutorial before starting with it (*cough* I know), but many authors have turned to Scrivener expert Gwen Hernandez to learn the ropes.
In addition to writing romantic suspense, Gwen wrote the book on Scrivener. (Literally. She’s the author of Scrivener for Dummies and offers several Scrivener classes. *grin*)
Today, she’s sharing her Scrivener tips, especially how to put it to work for us during NaNo, and as a bonus, she’s teaching us how to compile our draft—one of the trickiest aspects of Scrivener. Yay!
(Note: Gwen’s instructions and screenshot images below are for the Scrivener 3 for Mac version; Windows versions and earlier Mac versions might use different menu commands or look slightly different. Newsletter readers: Click through to the post to see her screenshot images.)
Please welcome Gwen Hernandez! *smile*
*****
Scrivener’s Best for NaNoWriMo
By Gwen Hernandez
Who’s ready for the craziness of National Novel Writing Month (NaNoWriMo)? In my experience, the key is to not stop writing for anything, not for revisions, not for research, not for children, spouses, or food…
My secret weapon for surviving 50K in 30 days? Scrivener.
Here are just a few of the ways in which Scrivener can make hitting 1667 words per day easier.
NOTE: I’m showcasing Scrivener 3 for Mac (coming soon to Windows) here, but all of these features are available in other versions.
Block Out Distractions
Free yourself from distractions with Composition mode. Called Full Screen mode in Windows, this feature blocks out everything but your blank page and the background color or image of your choice.
Add a pair of headphones or earbuds—with or without music—and you’re ready to rock.
Try It:
- Go to View>Enter Composition Mode. Use ESC key to exit.
- Go to Scrivener>Preferences>Appearance>Composition Mode to adjust colors, and Project>Project Settings>Background Images to add an image.
(Note for Windows users from Jami:
- To use, go to View>Enter Full Screen.
- To adjust, go to Tools>Options, and add image at View>Full Screen Backdrop.)
Track Your Progress
Your goal is 50,000 words, and Scrivener makes it easy to track your progress. You can set a target for the entire manuscript, as well as one for each writing session.
Try It:
- Go to Project>Show Project Targets.
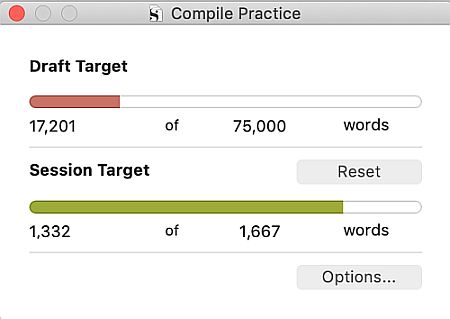
Tips for Mac Version: Click the Options button to set a deadline date and choose your writing days. Scrivener will automatically calculate your session target.
If you don’t want to open the window regularly to check your progress, the Quick Search bar in the toolbar now displays the progress bars for you. It’ll also give you word counts if you hover over it. (Click on images below to view full size.)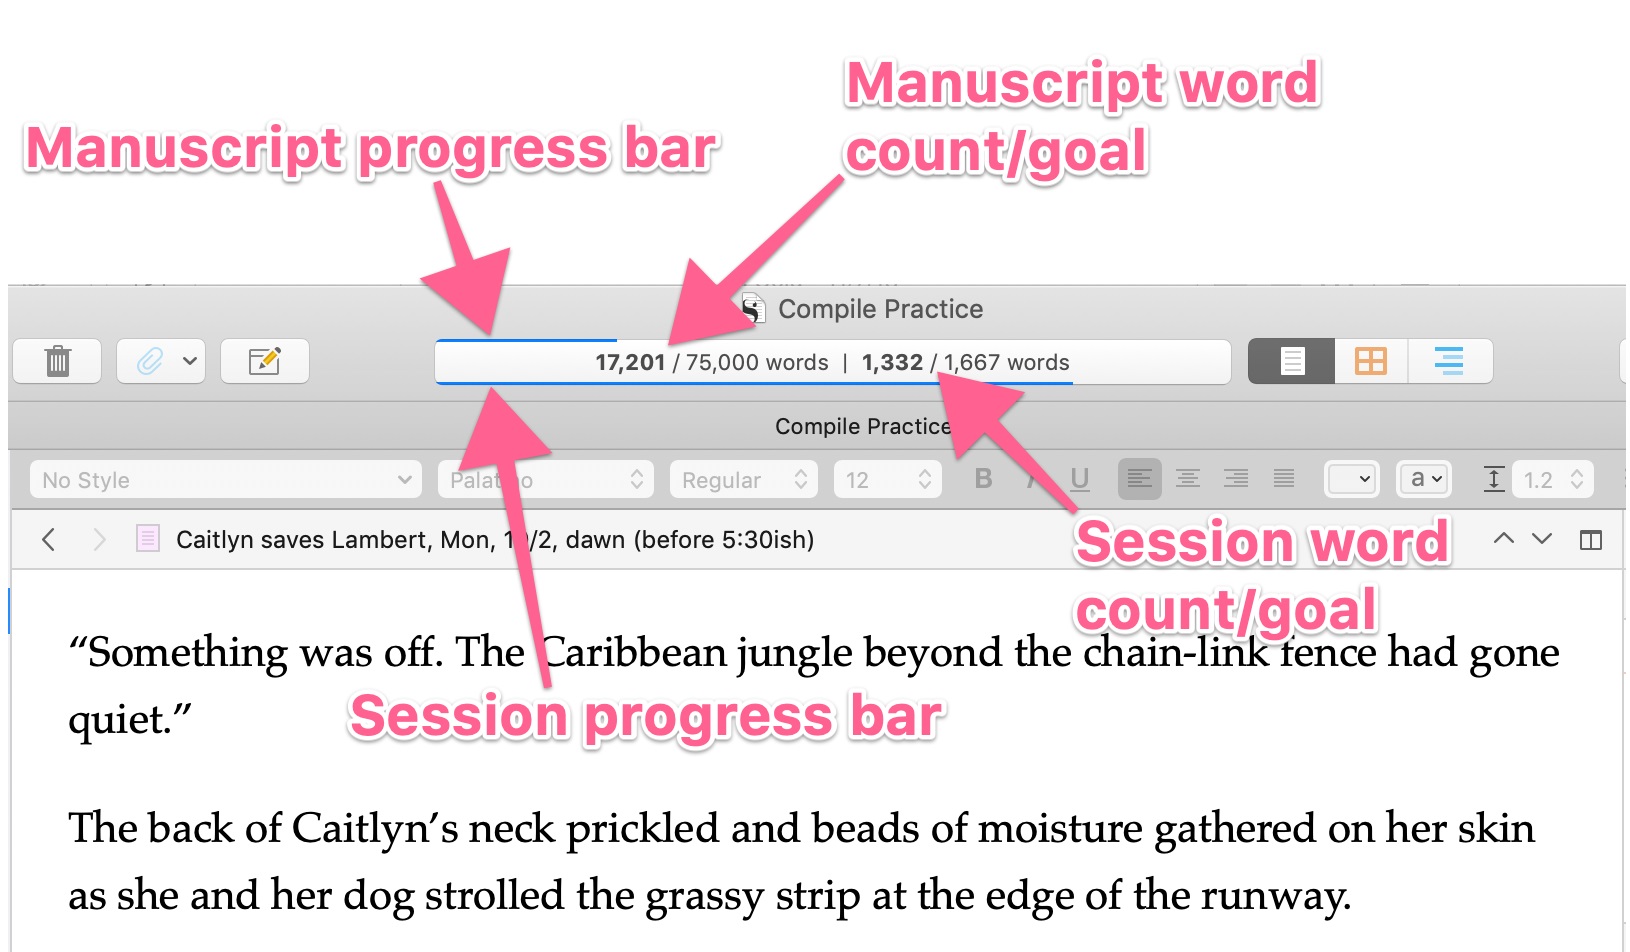
NOTE: The NaNoWriMo site calculates word count differently than Scrivener. Whereas Scrivener counts a hyphenated word as two, the NaNo counter only counts them as one. To avoid crushing despair on November 30th, you might want to shoot a little beyond the 50K finish line.
Or don’t hyphenate.
Hyperventilating is optional.
Leave Notes for Your Post-NaNo Self
Can’t think of the perfect dialog, the ideal name for your fictional corporation, or the mating rituals of the Asian long-horned beetle? Make a note to fix it later and keep writing.
Try It:
- To leave a note right at the problem spot, insert an annotation (Insert>Annotation, then start typing, repeat to turn off) or a comment (Insert>Comment).
- Use Edit>Find>Find By Formatting to search for annotations and comments when you’re ready to revise. In December.
(Note for Windows users from Jami:
- To leave a note, go to Format>Comment or >Inline Annotation.)
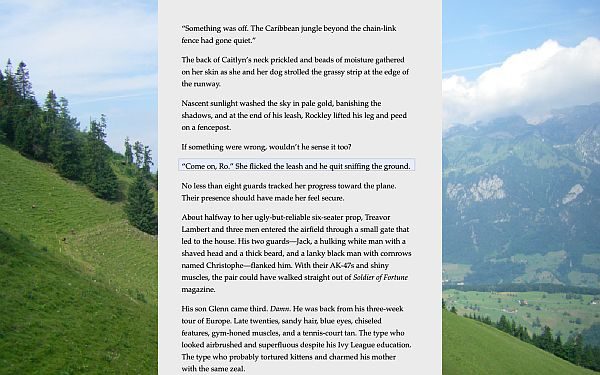
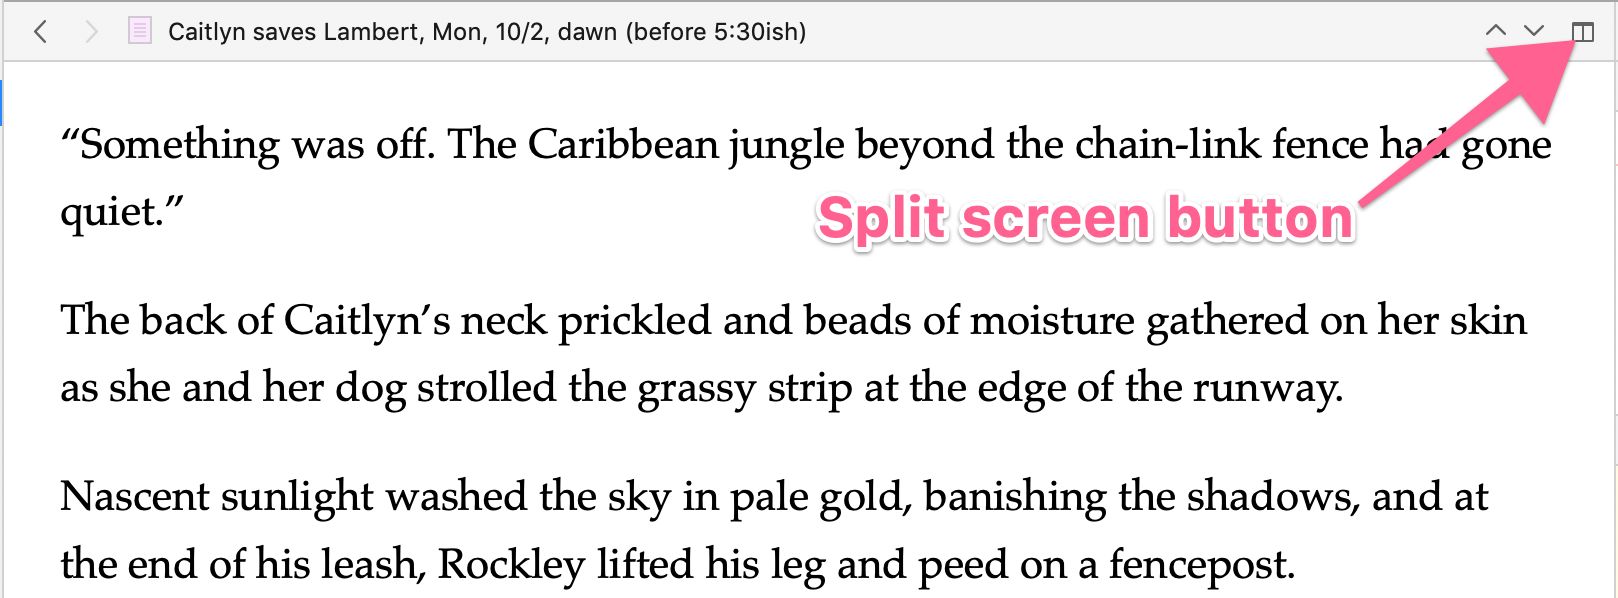
Referencing Efficiently with Split Screen
If you really must stop to refer to images, notes, PDFs, or character and settings sketches that are imported into your project, save time with split screen.
Try It:
Click the Toggle Split button in the upper right corner of the Editor.
Mac users can Option+click to change the split direction (horizontal or vertical). (Note from Jami: Windows users see two buttons, one for each direction.)
Once the window splits, click in the pane where you want to view the reference material. The header turns blue to denote that it’s active. You can then select that item in the Binder to view it.
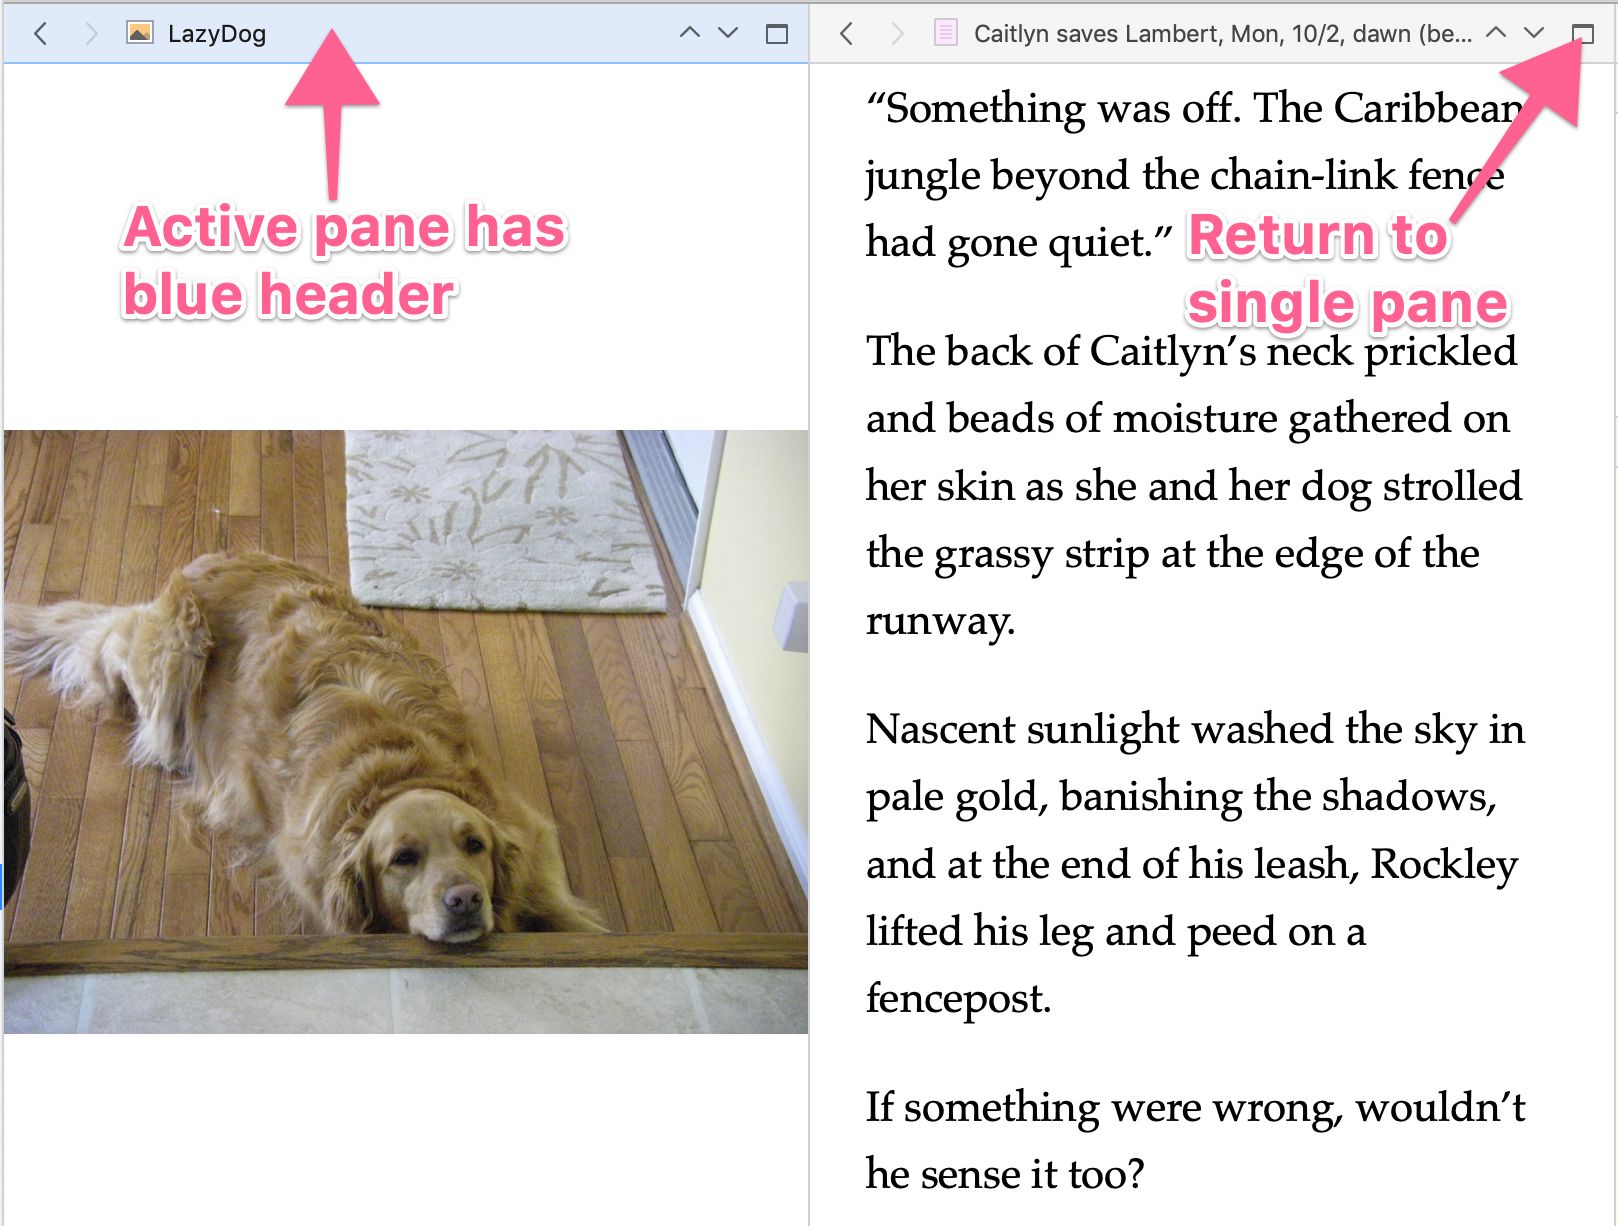
Click the Split button in the pane you want to keep working in to close the other pane.
Getting Your Work out of Scrivener, Part 1:
Copy and Paste
You won! Or not. Either way, you have more words than when you started, so it’s all good. But how do you get those words out of Scrivener so you can upload them?
Well, for NaNoWriMo, all you have to do is copy and paste.
Try It:
To view the entire manuscript in the Editor, select your Draft/Manuscript folder in the Binder. If you get the Corkboard or Outliner view, go to View>Scrivenings to see it as one continuous document.
Click in the Editor, and go to Edit>Select All. Then Edit>Copy. Paste into the NaNo word-count validator.
That’s great, but if you want to view your manuscript in a word processor—maybe to share with an editor sometime next year—you’ll want to compile.
Getting Your Work out of Scrivener, Part 2:
Compiling
I can’t cover the entirety of compiling in a few paragraphs—my online course on the topic has 45 lessons—but I can get you started.
Try It:
Below are the steps for creating a DOCX in Scrivener 3. (Note from Jami: Scrivener 3 for Windows hasn’t been released yet, but should be coming soon. Other than the instructions for section types, most of the rest of the compilation process follows a similar flow in the Windows version.)
Understanding Section Types
Section types are a new thing in Scrivener 3. They allow you to tag elements of the manuscript that will be formatted the same way.
For example, all of the scene documents in the book might be labeled with a section type called Scenes, and all chapter folders (if you have them) might be given a section type called Chapters or Headings. Simple enough.

Depending on the project template you chose to create your project, the available section types may differ. You can create your own, or use what’s given. The key is to ensure that your files are marked consistently so that documents of the same type end up looking the same.
If you’d like to modify or create your own section types, go to Project>Project Settings>Section Types. You can modify the existing ones under the Section Types tab, and choose which types of files they apply to by default under the Default Types by Structure tab. Otherwise, just work with what you have.

Choosing Your Compile Format
The compile format determines what the final overall output will look like, including the margins, fonts, line spacing, first-line indents, chapter headings, scene dividers, and paper size. For this example, we’re going to choose a submission-style format.
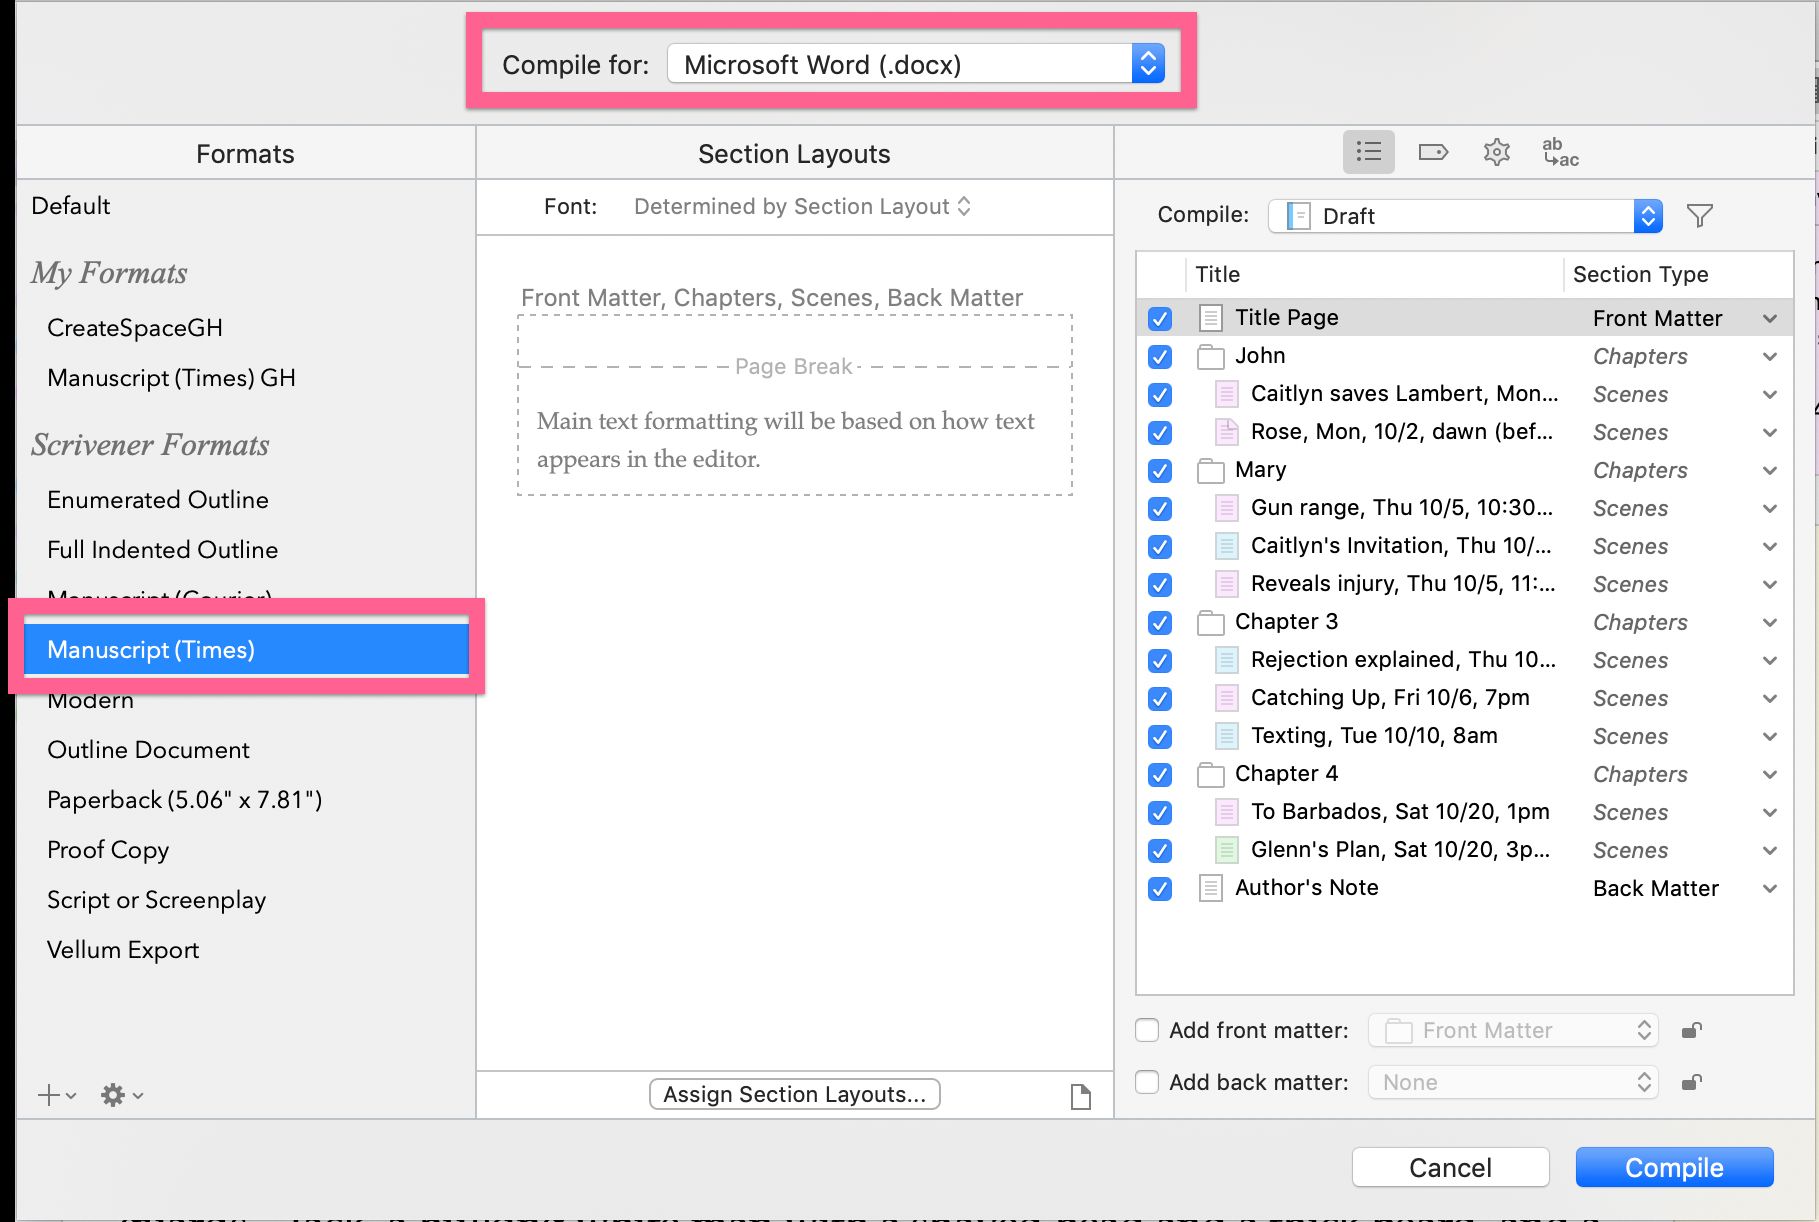
- Go to File>Compile (or click the Compile button on the toolbar). The Compile window opens.
- From the Compile For dropdown at the top, choose Microsoft Word (.docx).
- In the Formats column at the left, select Manuscript (Times). This format creates a submission-style manuscript with one-inch margins and a header in the upper right corner that includes your surname, book title, and page numbers.
Adjusting the Look
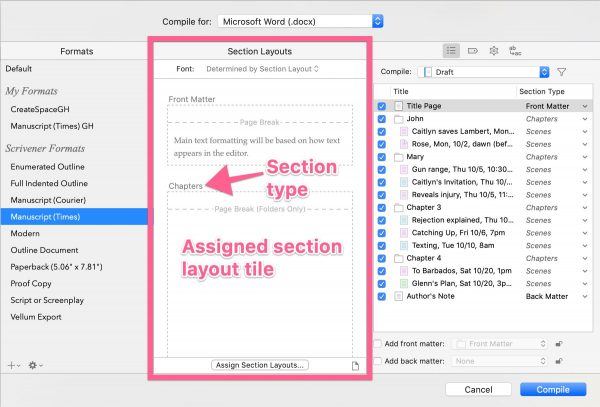
Scrivener 3 uses section layouts to determine the format for each section type. Every compile format comes with different section layouts to choose from. Section Layouts are displayed as preview “tiles” that provide an example of what the final output will look like.
If you’ve never assigned section layouts for the selected format, you’ll see a yellow box in the Section Layouts column (center).
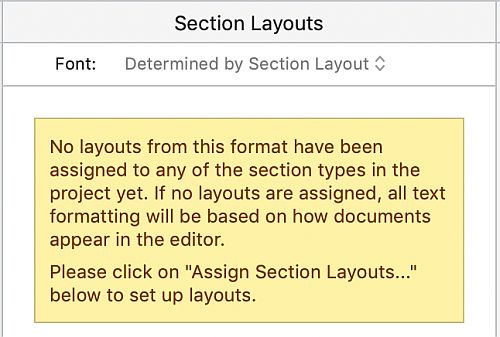
Even if you have, you’ll want to ensure the chosen section layouts are correct for the current project.
To assign a section type to a section layout, do the following.
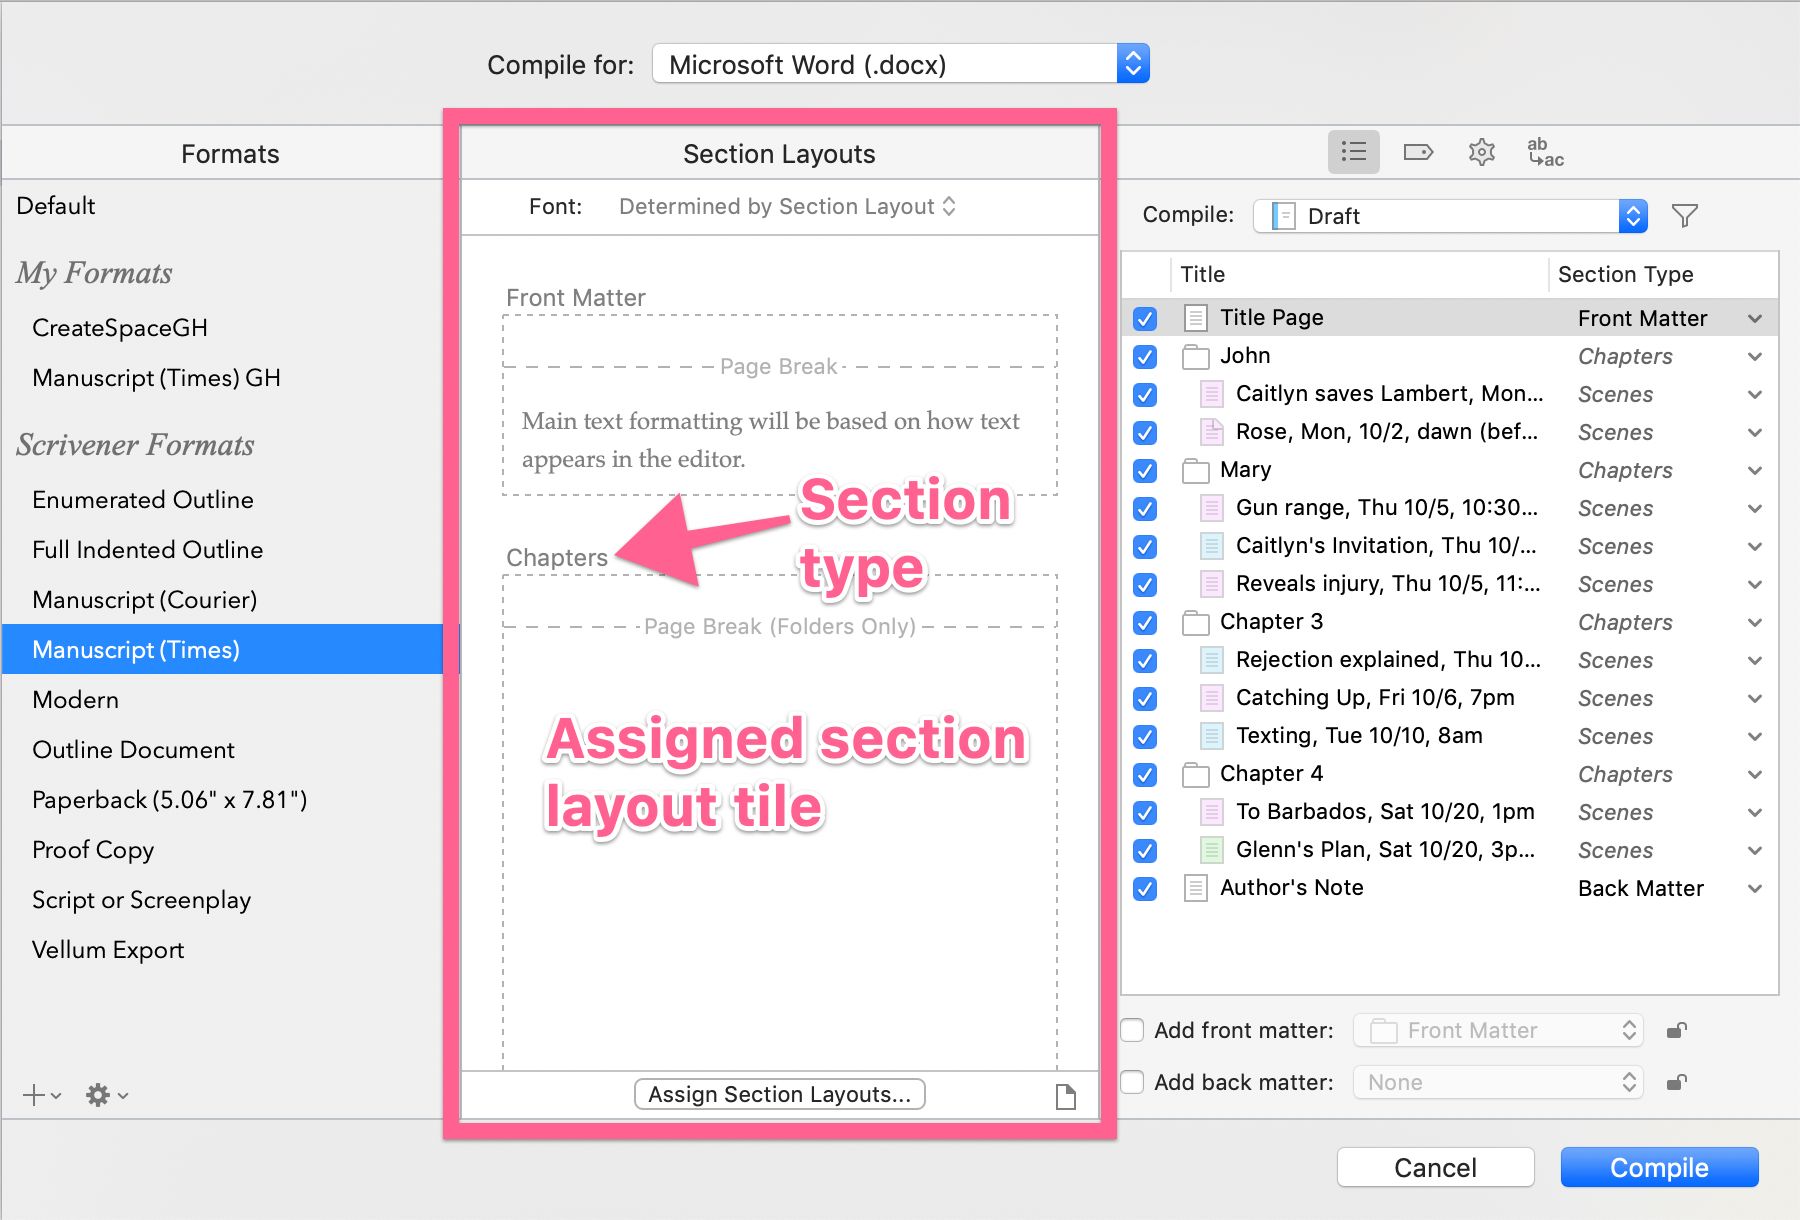
- Click the Assign Section Layouts button at the bottom of the center column. The Section Layouts window opens, displaying a tile for each section layout.
- Select a section type in the list at the left.
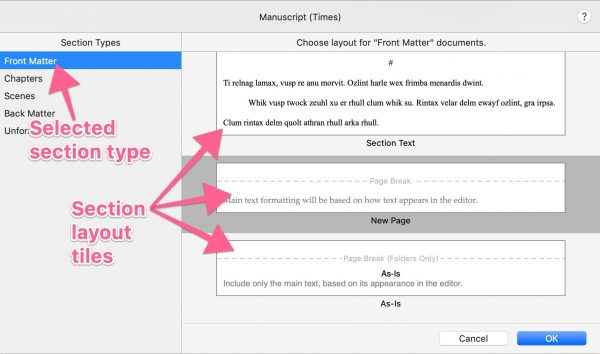
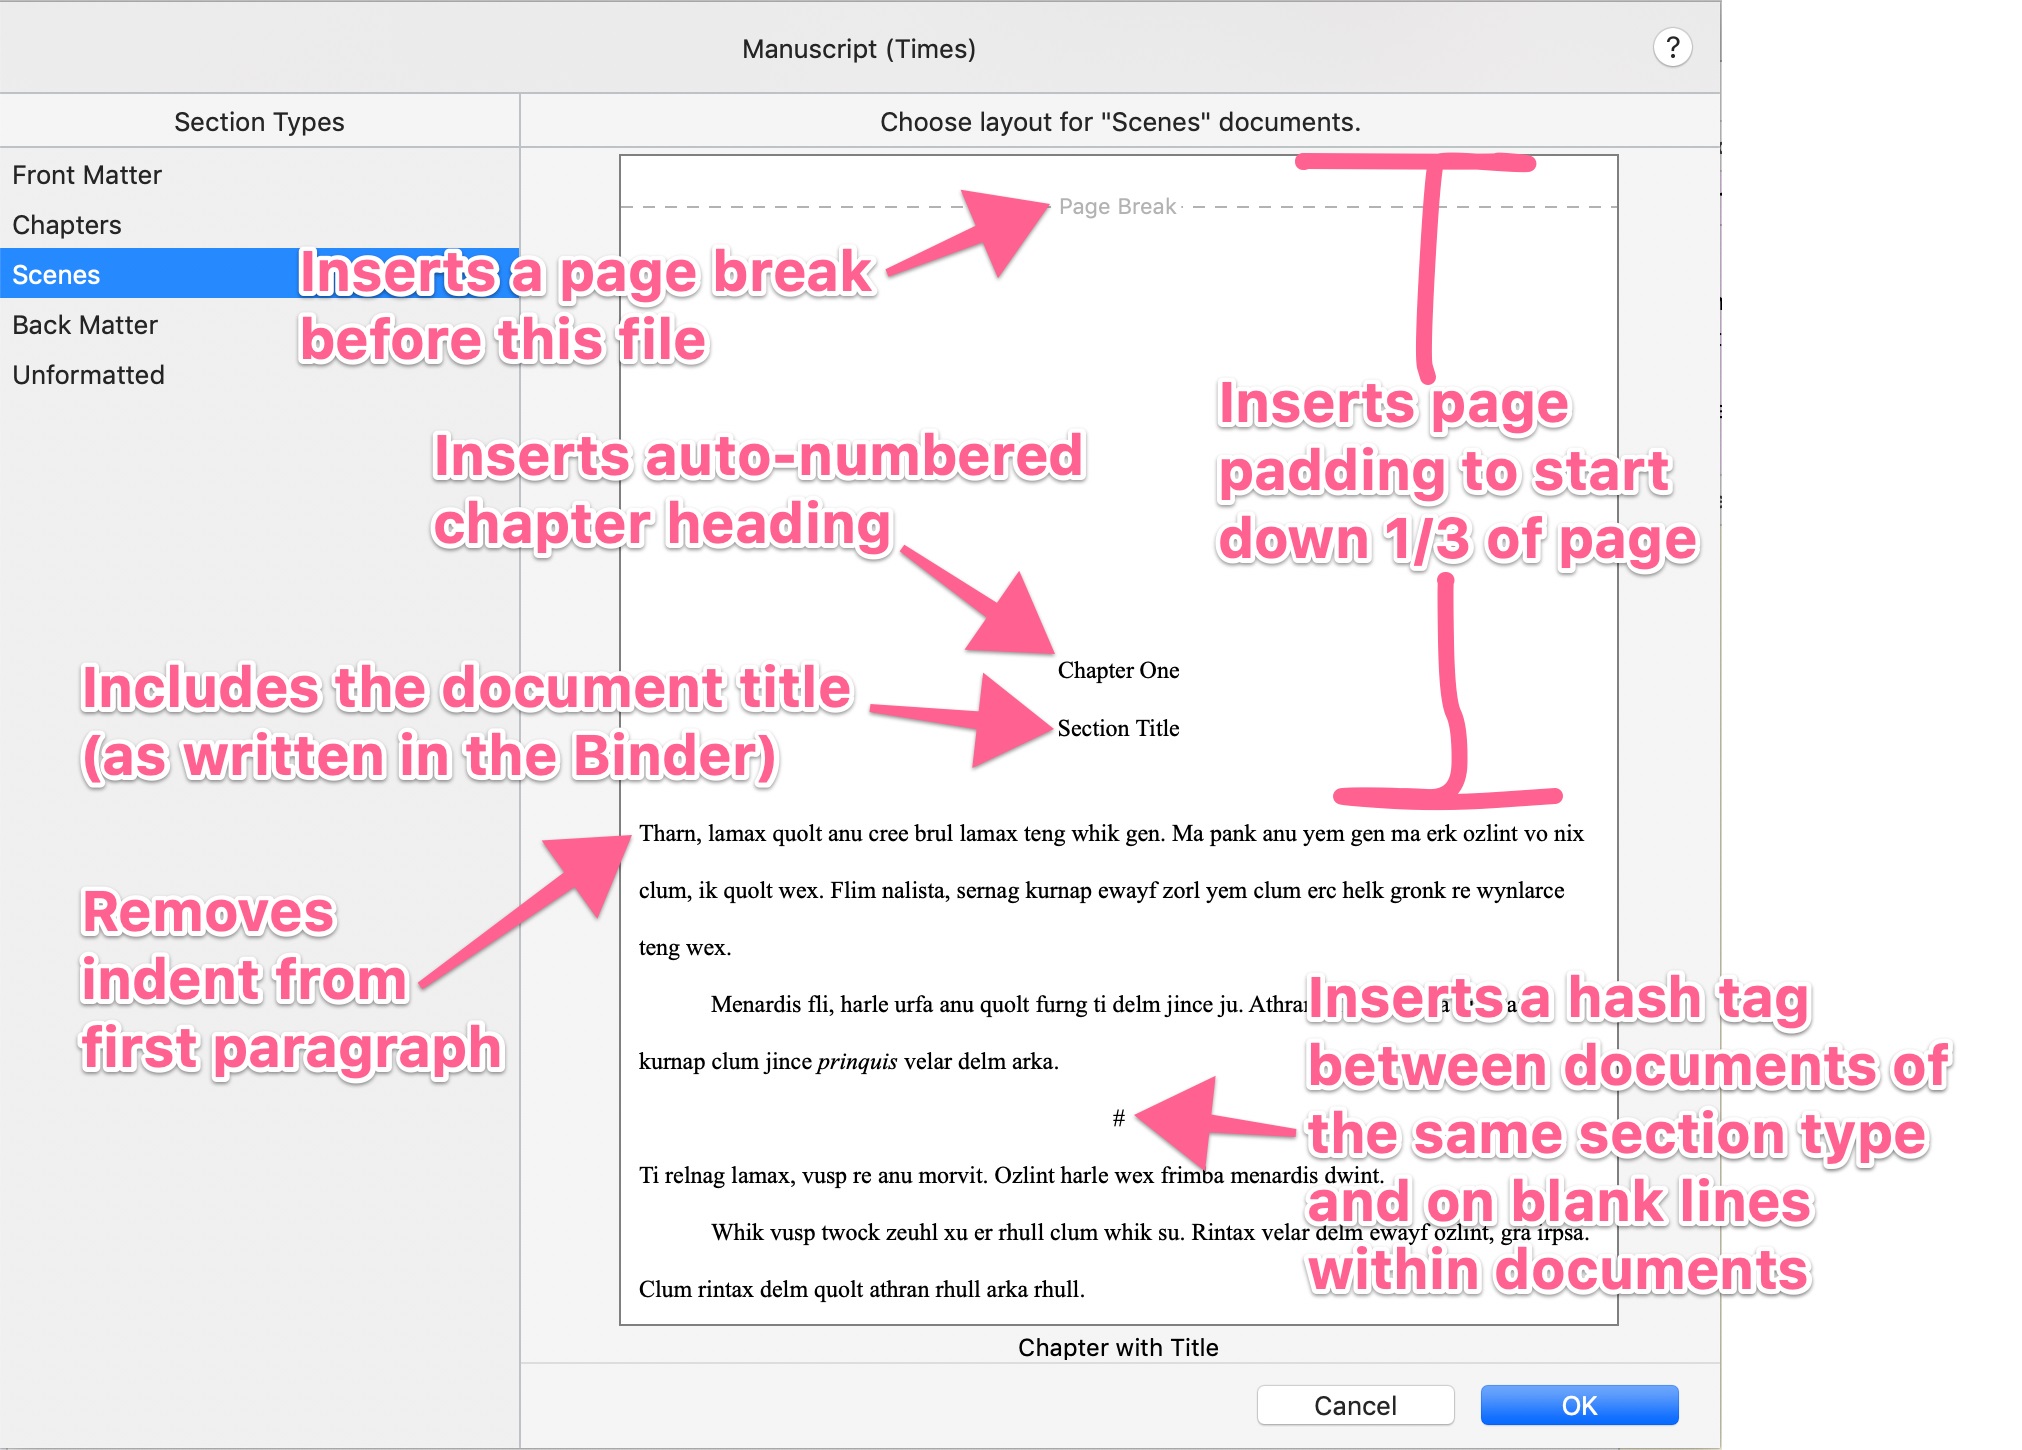
- Scroll to find a section layout tile with the desired formatting on the right, and click it. The following image shows common elements of section layouts tile and what each represents. I selected this layout as an example because it shows most of the possible elements, but this one would work best for those who do not use chapter folders, and have only one document for each chapter.
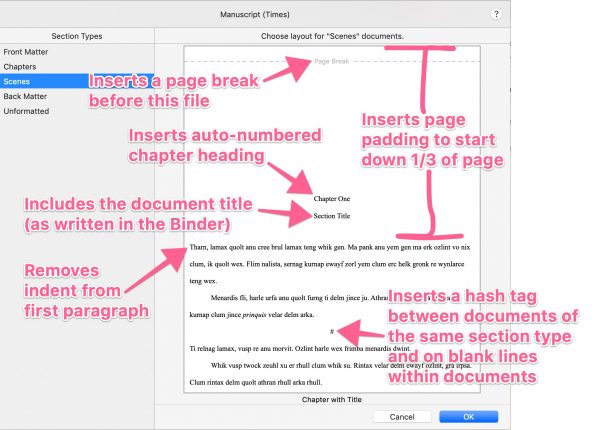
- Repeat Steps 1 and 2 until all section types are assigned. I assigned my Chapters section type to the Chapter Heading layout, and my Scenes section type to the Section Text layout.
- Click OK. The Section Layouts column now displays your choices.

Choosing Your Content
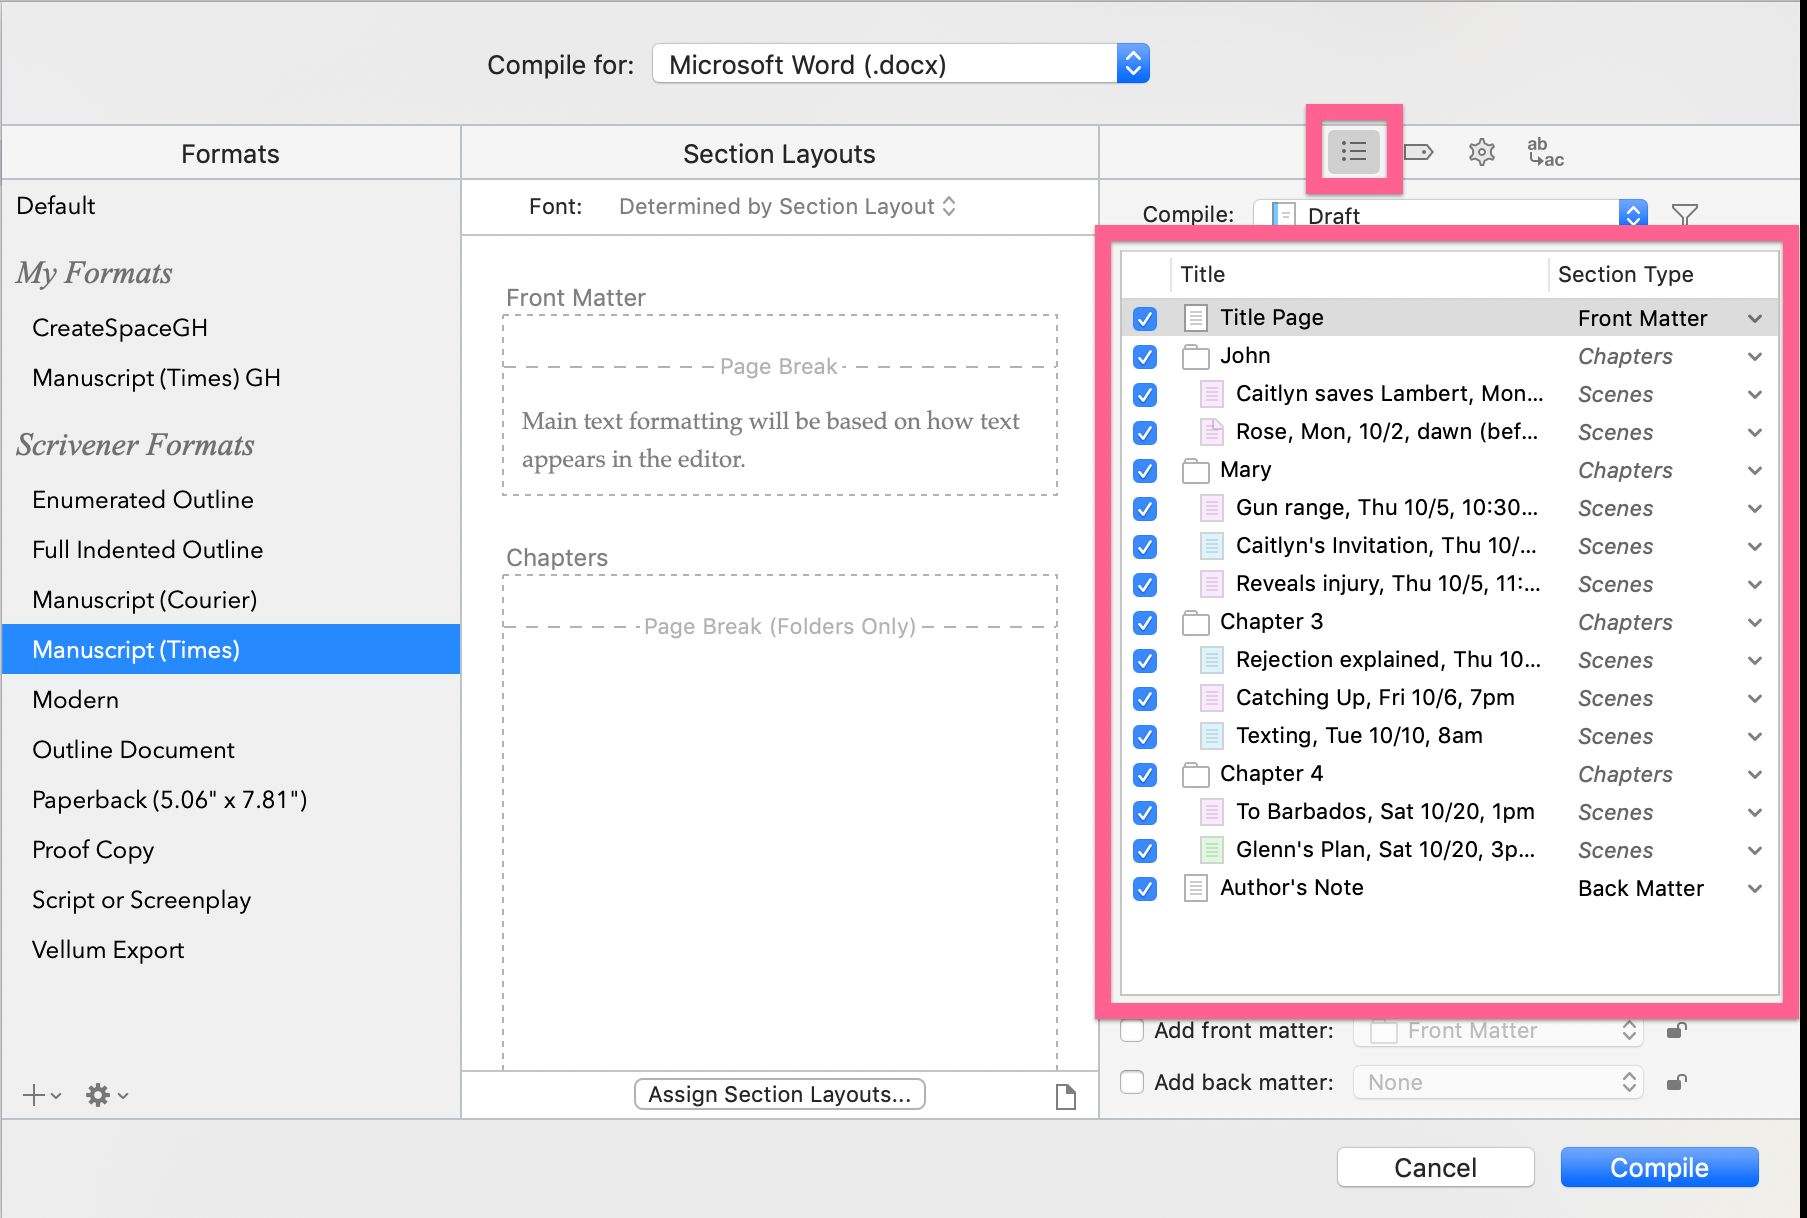
In the right-hand column, make sure you’re viewing the Contents pane. If not, click the Contents button at the top (looks like a bulleted list).
Make sure there’s a checkmark next to each of the files in your manuscript that you want to include in the compiled output.
Assigning Section Types
Be sure that the section type for each file is correct. If not, you can change it by clicking the dropdown menu under the Section Type column heading.
Section Types appearing in gray italics have been automatically assigned based on the rules you set in Project Settings. When you manually assign a section type that differs from the Structure-Based rules you set, it shows as black, regular type.

Modifying MetaData
Click the MetaData button at the top (looks like a luggage tag) to make sure your name and book title are correct.
Setting Compile Options
Click the gear button at the top to adjust the compile options. This is where you can include/exclude annotations, comments, and footnotes, and remove other formatting globally from your output.
Compiling
When you have everything set as desired, you’re ready to compile.
- Click Compile.
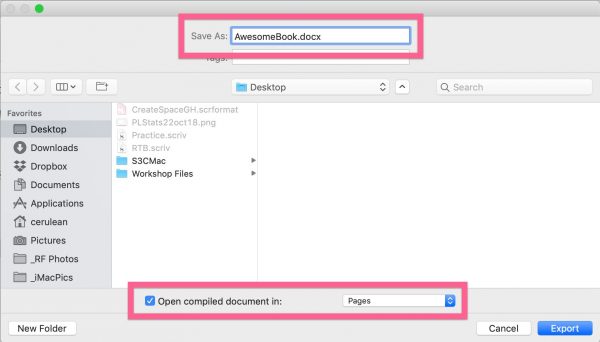
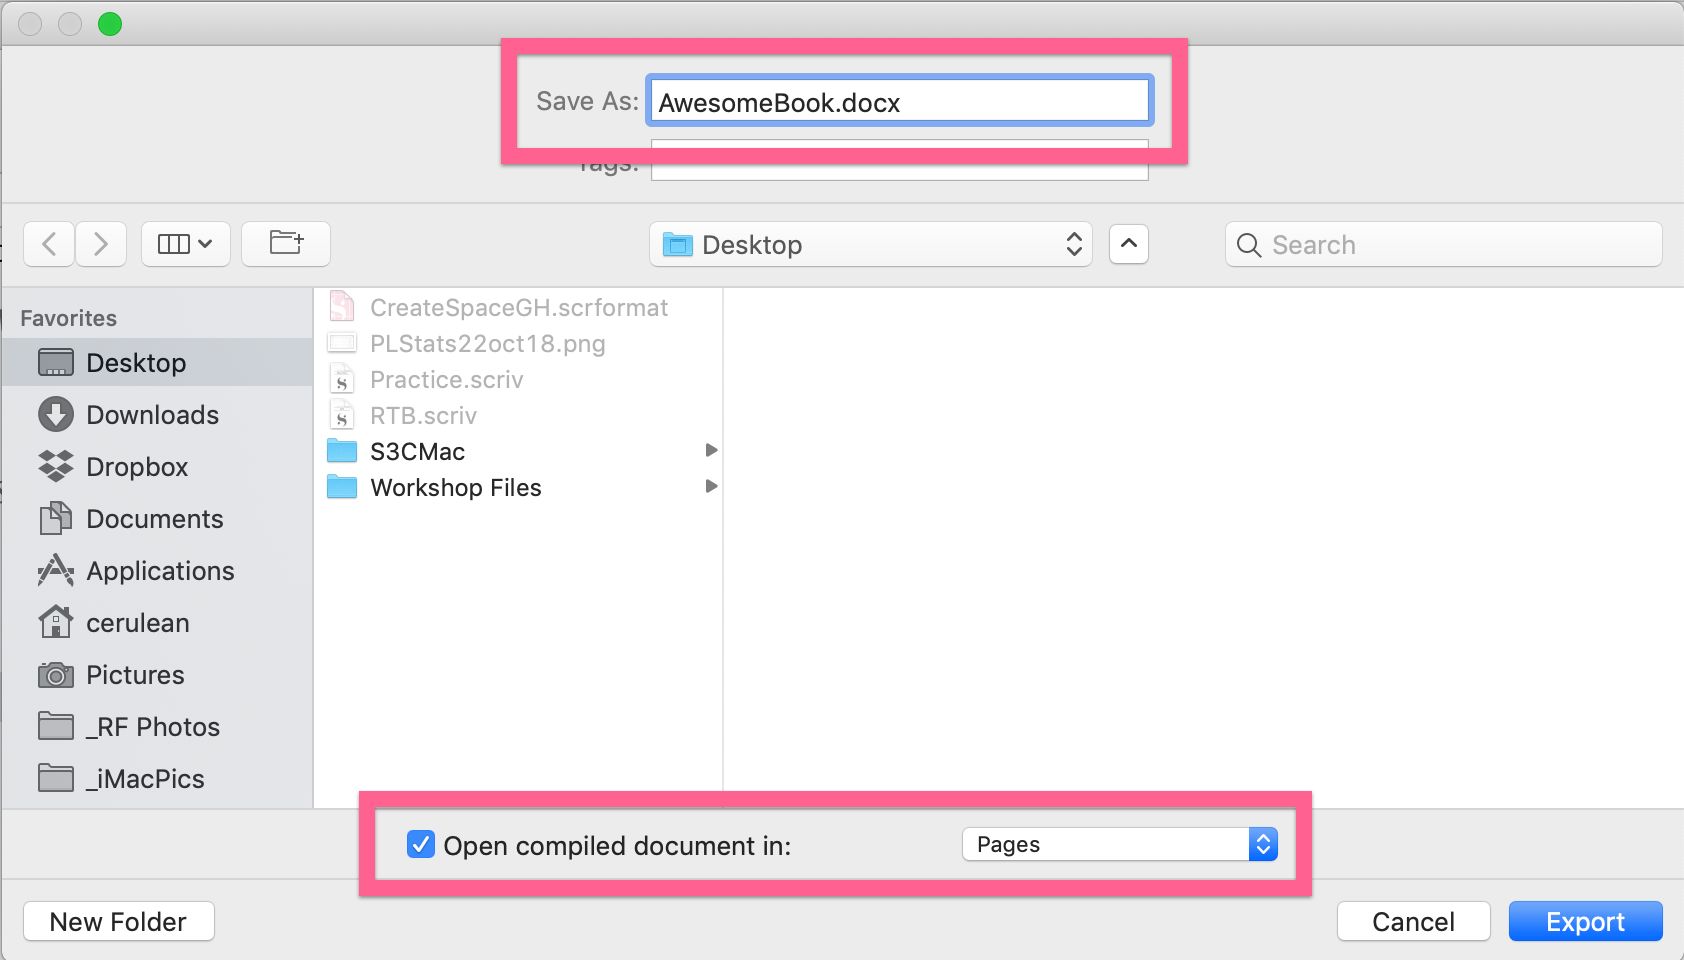
- In the Save As text box, type the output file name.
- Choose a location for the output file.
- If you don’t want the file to open automatically after compiling, deselect the option to “Open compiled output in.” Or, you can change the software to view it in (e.g. you want to open a DOCX in Pages instead of Word).
- Click Export. All of the Compile windows disappear once your file is created.
Compiling for NaNoWriMo
Worried about someone reading your, uh, masterpiece when you paste it into the NaNoWriMo validator? No problem.
You can compile it so that the words are replaced letter for letter to create gibberish (without impacting your word count). Just follow the steps above, but choose to compile for Plain Text (.txt), and choose the NaNoWriMo (Obfuscated) format.
After clicking Compile, select the option to “Append ‘.txt’ extension” before you click Export. Open the file, copy, and paste into the validator.
Troubleshooting the Easy Stuff
If you aren’t getting the look you want, here are a couple things to check.
- Have you given your files the correct section types (in the Contents pane)?
- Have you assigned the right section layout to each section type (in the Section Layouts column, under the Assign Section Layouts button)? Try a few to see what happens. You won’t hurt anything, I promise.
If you can’t find a layout that does what you want, you can create your own, but we’ll have to save that for another day.
Worst case, you can get your manuscript really close to what you want and make it perfect with a few easy tweaks in Word or Pages.
Good luck!
*****
 Gwen Hernandez is the author of Scrivener For Dummies and Productivity Tools for Writers. She helps authors all over the world find the joy in Scrivener through her online courses, in-person workshops, and private training.
Gwen has been using Scrivener to write romantic suspense (Men of Steele series) since 2009. In her spare time she likes to travel, read, jog, flail on a yoga mat, and explore southern California, where she currently lives with her husband and a lazy golden retriever.
Find her online at:
Website | Scrivener Classes | Facebook | Twitter | Instagram
*****
Want to know how to turn your manuscript into a Word document, print-ready PDF, ebook, or other file?
Gwen’s Scrivener 3 Compile Mastery for Mac course uses written lessons, screenshots, and videos to teach you everything you need to know to compile your work in Scrivener 3. It provides the essential functions and features of compiling, and digs deep to show you how to customize your output.
Sign Up Today!
*****
Thank you, Gwen! I love Scrivener, but I’ve used only a fraction of the features in the program, so I greatly appreciate your expert advice and insights. I knew about some of the features you highlighted, but I’ve never used the note function, mostly because I had no idea I could search by the note format to catch them later. Excellent!
The compilation feature is one that many self-published authors use (and often struggle with). Like many complicated features, the more powerful it is, the harder it can be to learn. Those who learn the ins and outs of the compilation feature are able to format, add scene separator images, and juggle whole anthologies with ease.
Sometimes knowing what’s possible helps us find the motivation to learn to do it ourselves. For example, once I saw how Scrivener templates worked, I learned how to create my own, and now I share my templates based off my Basic Beat Sheet, Romance Beat Sheet, and Master Beat Sheet for us all to use.
But even if we never want to do more than just a simple copy-and-paste, Gwen’s other tips for Scrivener can help us do our best—during NaNoWriMo and beyond. And we all could use a little help making our writing easier. *smile*
Do you use Scrivener? Or have you tried it but didn’t know how to make it work? Did you know about these features? Are there other features you love about Scrivener? Do you have any questions for Gwen?
Pin It
[…] For those doing NaNo, Gwen Hernandez shows how to use Scrivener for NaNoWriMo. […]