Revising without Tears — Guest: Rachel Funk Heller
I’m heading out for vacation this week and next, but don’t worry. I have a great selection of guest posts ready to fill in for me that I’m super excited to get to share with you. *smile*
First up, let’s talk about revision. Ack! If you’re anything like me, you might have a love/hate relationship with revisions.
I love seeing my story strengthen and improve. But sometimes I hate the struggle to make the ideas of the first draft fit into a solid story.
Today’s guest wants to help us find the important aspects of each scene so we can revise without tears. Even better, Rachel Funk Heller is sharing a worksheet with all of us from her Writer’s Coloring Book.
A coloring book for writers? Is it just me, or does that sound like fun (and might be just what we need to avoid those tears)? *smile* Please welcome Rachel Funk Heller!
*****
The Master Scene Profile:
Planning the Next Big Revision
You’ve heard it said so many times it makes your head hurt: writing is re-writing. You know that revision is the key when it comes to crafting your best work.
But what they don’t tell you is how nerve wracking, intimidating and daunting this task is. You want to make this book rock. You want it to translate that great mind movie you see in your head.
You’ve got your notes back from your editor, or you’ve just re-read your latest project and you know it needs work, but where to start? How to start? You know you need a plan, but where do you start planning your plan?
Because I hated the frustration that comes with this vital part of the process, I created a worksheet to help me come up with a strategy. I wanted a way to make a laundry list of all the great elements that I wanted in each scene, but didn’t want to do countless revisions of my revisions.
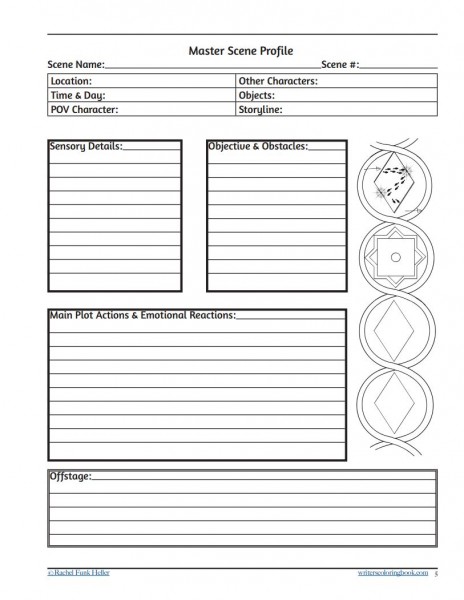
Introducing the Master Scene Profile Worksheet
So I created the “Master Scene Profile.” (Click the link and then scroll to “Download Sample Worksheet” to download a free copy along with a set of instructions.)
I used to be a television producer and when you work on a large production, you create what’s called a “call sheet.” It is a daily list of cast, crew, and equipment needs for each day of shooting. I took an old call sheet and created a form that helps me to list everything I want or need in each scene of my book.
Now, I can already hear some of your reactions: “What?? I need to fill out a form? I have to do paperwork on top of revising my book?”
Yes, it sounded silly to me too, but I soon discovered that taking time to fill out the form took the pressure off making sure I got everything right the first time around. Part of my brain said, “Oh, it’s just a form to fill out. It’s not writing.” It may also feel like procrastinating, but you are doing real, honest work to make your project better.
Understanding the Master Scene Profile
The form is divided into several sections. I suggest you fill out one form for each scene in your book. I’ll go over each section in a little more detail:
Scene Name:
It’s a good idea to give each scene a name like “the confrontation at the ranch” or “Joe breaks into the underground vault.” It gives you a snapshot of the action and helps track your plot sequences.
Scene Number:
Once you’ve shuffled all of your scenes and have them in the order you want, it’s a good idea to number each scene. If you realize you need to add a scene later you can add a letter like Scene 9A.
First Table:
This first box I refer to as “Housekeeping.” It’s the basic information:
- Fill in the boxes for location and day/time to plant your scene in time and place. I have also included a box for lighting/mood to get you thinking about the general mood of this scene.
- Next, if you are writing a novel using third person and have several POV characters, list the name of the of the main POV character in this scene. This is a good reminder not to “head hop” or change POV characters.
- List other characters that appear in the scene.
- List all of the objects in the scene: a cell phone, a stolen watch, a set of golf clubs, a thumb drive, or a time bomb. These are items that your characters will interact with in the scene.
- Finally, in the Storyline box, make a note if this scene is from your main story line or from a subplot.
Sensory Detail:
To make your story lifelike and anchor your reader in the reality of your story world, engage their senses: sights, smells, textures, sounds, and flavors. Don’t rely on generic locations, like “an office building.”
Make your scene pop off the page by adding specific and unique details and describing how your characters react to them. Describe the sounds she’s hearing, or describe her reaction to the food she eats.
And you don’t have to be too wordy here. Read the following list: rotten fish, moldy cheese, and week-old pizza. Is your nose itchy or your stomach turning? Be specific.
Objective and Obstacles:
This is where you list your character’s objectives, obstacles, and adjustments. At the beginning of the scene, you should know exactly what your character wants and why she is going to the specific place. What is her objective when she arrives at the scene?
In good stories, the character never just gets what she wants. She always hits at least one obstacle, maybe more. It could take the form of other characters that are competing for the same thing she wants. Or, maybe, they just don’t want to see her succeed, and they get in her way.
If you find out that there is no clear objective or that the obstacles are too easy for your character to overcome, you need to re-think this scene. Maybe it can be folded into another scene, or maybe you need to re-examine this particular plot line.
Main Plot Actions And Emotional Reactions:
In this box, list the series of actions and reactions that take place in the scene. It’s easy to list plot actions, but if you don’t track your character’s emotional journey, your scenes move the plot along, but they don’t grab the reader emotionally. And that is what your reader craves.
It also helps you to revise your scene with subtext in mind. You can figure out ways to communicate the emotions by “showing” them and not “telling” them. I know, this will take time, but the time you devote to this process will save you at least one major revision of your project.
Make sure you have everything you want this scene to accomplish. Heap on the conflict, highlight the emotions, and put your character through the ringer.
Offstage:
For those who are writing tightly woven plots, this next section is very helpful. It tracks important events that are happening offstage.
As an example, let’s say you’re writing a murder mystery, and in this scene, your detective is interviewing a suspect. While this interview is going on, the real killer is doing something dastardly to cover his tracks—killing someone else, getting rid of the murder weapon, or planning his escape.
For stories with many time lines, this is a great way to remind you of what is going on with other characters while this current scene unfolds.
What about the “Coloring” Part of the Book?
Now, you may have noticed some interesting graphics that run along the side of the form. The symbols are from other worksheets in The Writer’s Coloring Book, but I’ll give you a quick rundown of what they mean.
The twisting lines that look like a DNA double helix that runs down the page, one line is a symbol for time and the other is theme. Each little pocket, or oval stands for one scene in your book. It’s to remind you that want to weave time and theme elements together in your story. Each scene should contain some element that speaks to the larger themes you are exploring in your work.
Next, you notice there are diamond shaped symbols and then a more complex set of boxes and a small circle. This symbol stands for what I call “Big Moment” scenes, or what you would call plot points. That’s where the action in this scene turns the story in a new direction.
The diamond shape symbolizes what I call “linking” scenes. They are necessary to keep the story moving. They show scenes that are subplots in the larger narrative.
In the first diamond shaped you see little feet and tiny explosions. This is a visual rendering of the objective and obstacles.
At the top of the diamond, your character enters the scene. Then she encounters her first obstacle. Because of this she has to adapt to this new situation, so she turns around. But soon she encounters another obstacle. She changes tack once again. Then she leaves the scene, she is now different then when she entered the scene.
Remember, every scene in your story must have conflict and tension. Use this little reminder to make sure your scene is as effective as you can make it.
Make the Master Scene Profile Work for You
There you go. Please feel free to adapt the Master Scene Profile to meet your workflow, and create a great master plan for your next big revision.
Again, take the time to fill out one form for each scene in your book. Next take the time to read through the forms and come up with the best order for your scenes. Shuffle them around, play with them, and experiment to your heart’s content.
If you discover there are missing scenes, fill out a blank form with all the information about that scene and what you want to happen in it. This will be a much more effective use of your time than if you tried cutting and pasting whole scenes in one long document. When you are happy with the scene order, go back in and number all of your forms.
When you are ready to sit down and write, I suggest you start each writing session by taking up one completed MSP at a time. Review it, write any last-minute details that you want to add, and then focus all of your concentration on this one scene. It will be easier to do because you won’t have to worry about how this scene meshes with the next. You’ve already decided on your plot sequence ahead of time.
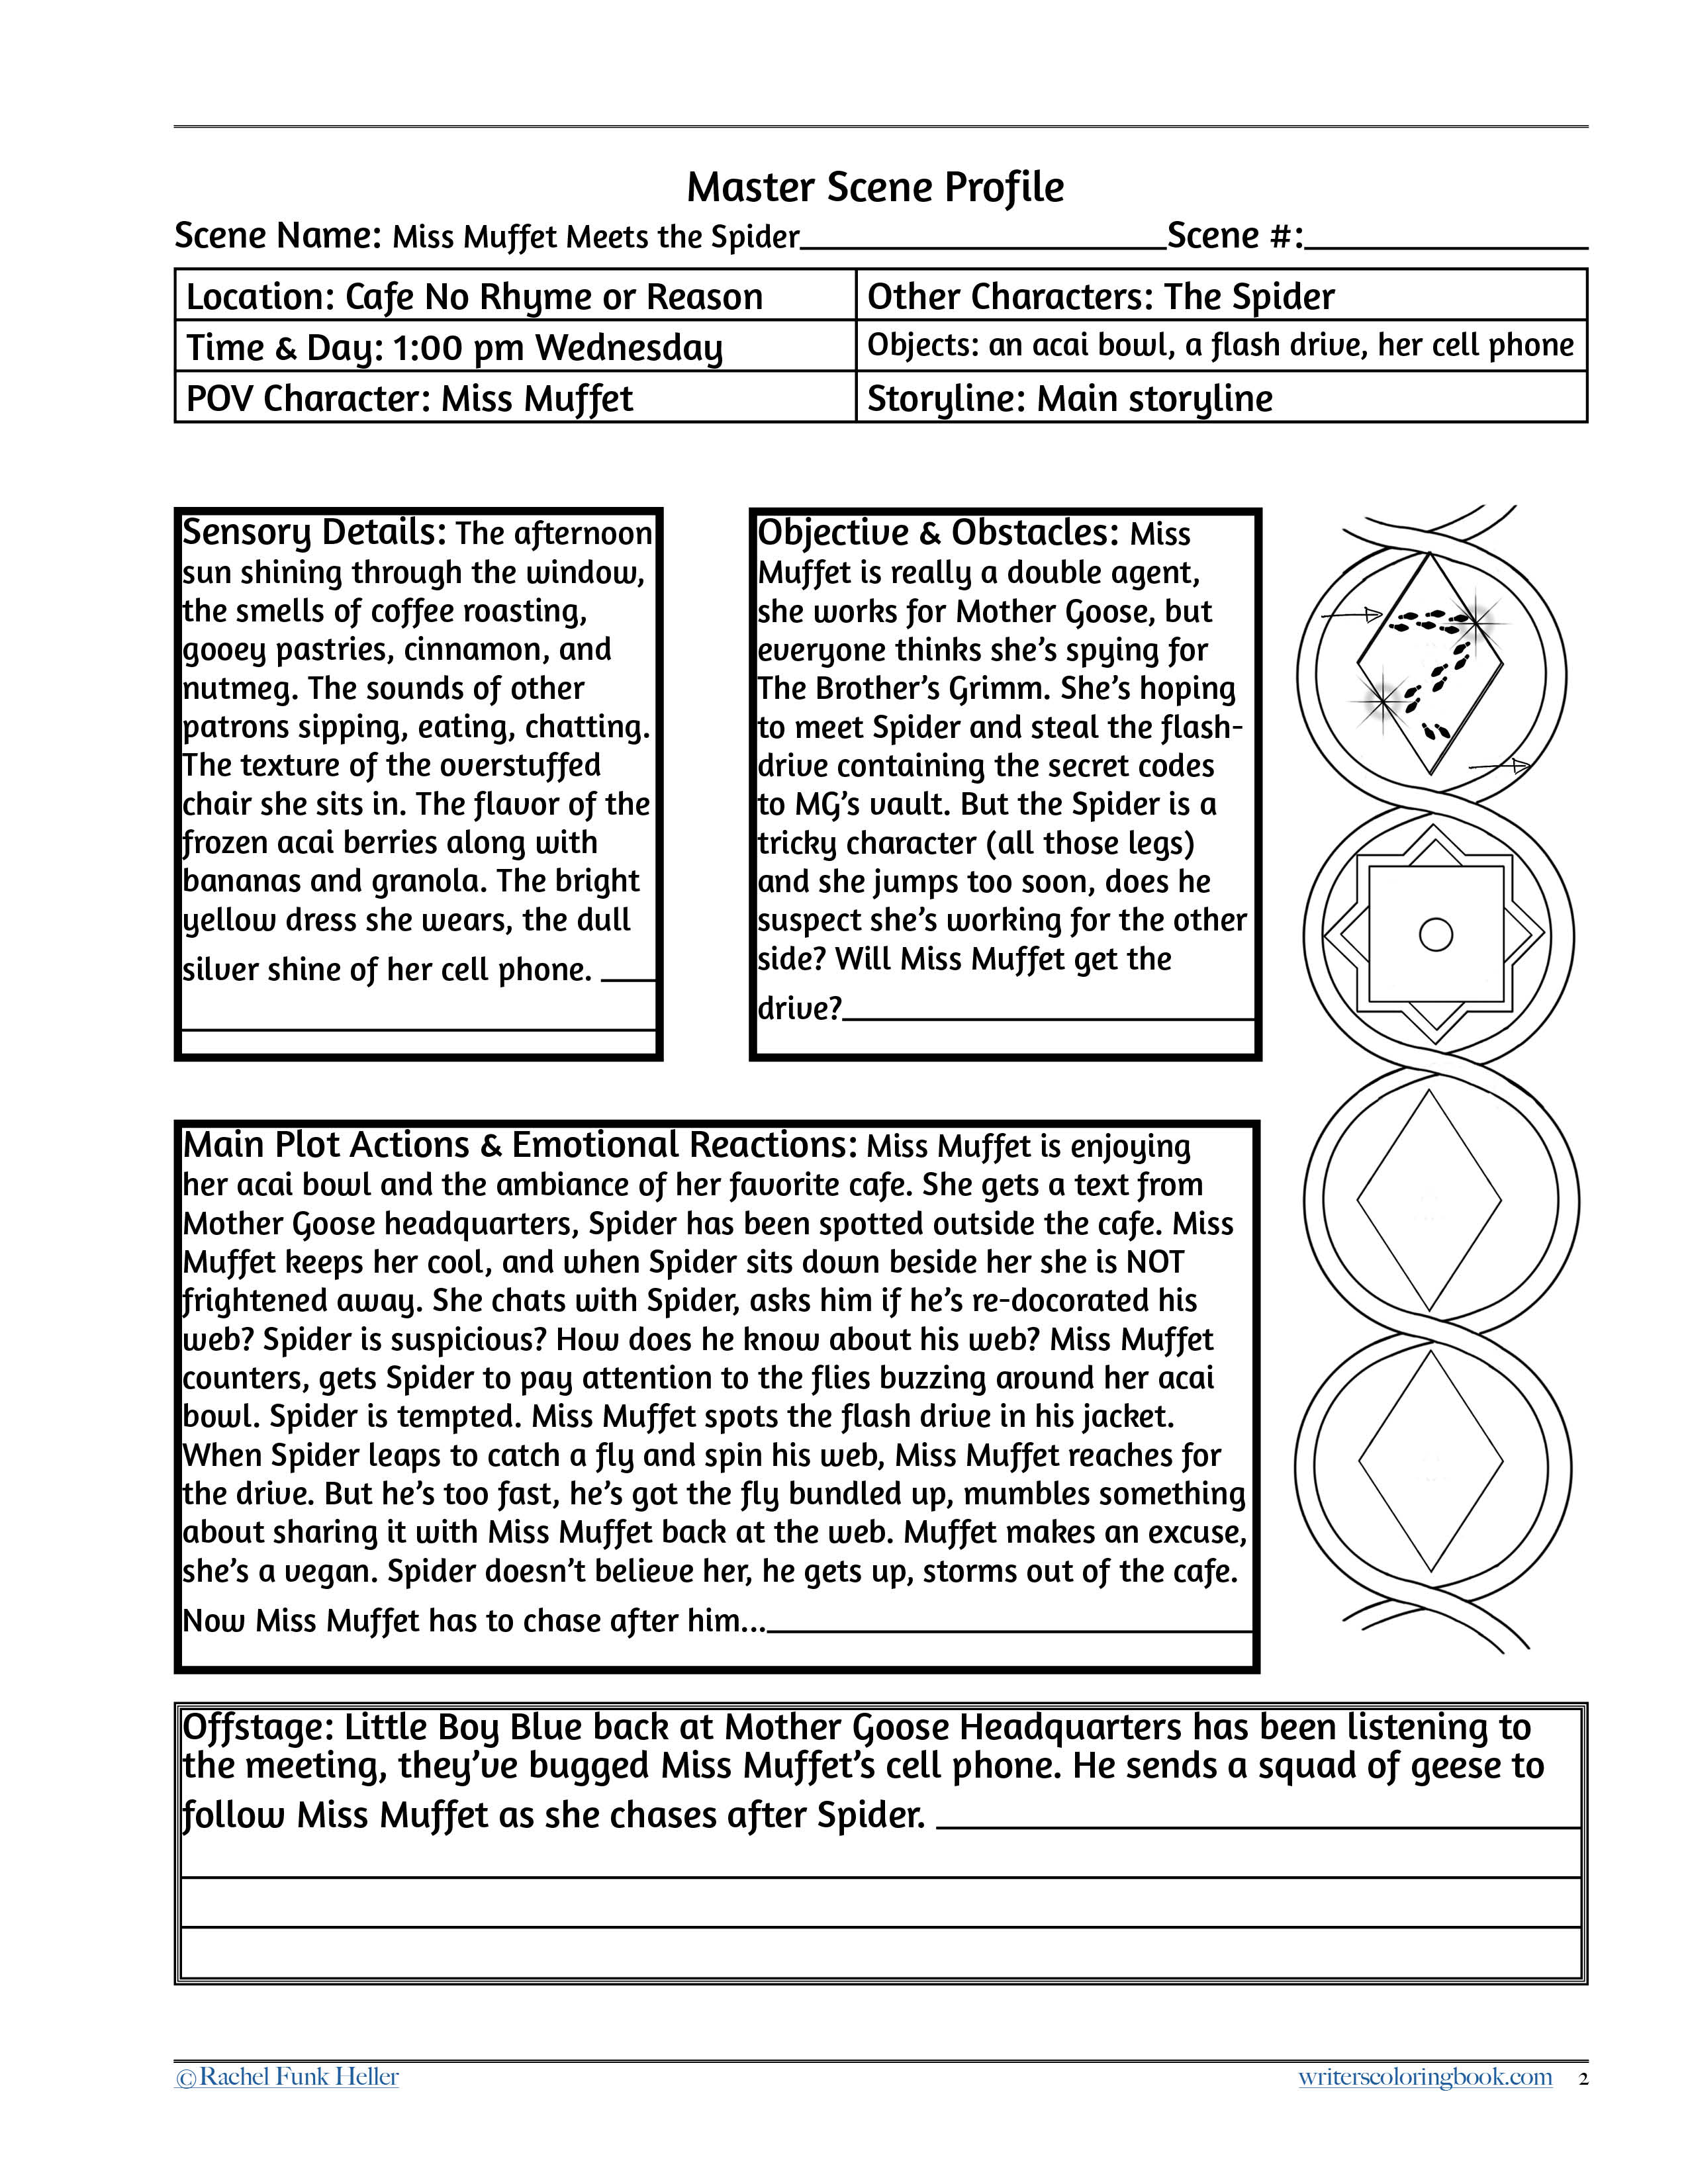
An Example: How to Use the Master Scene Profile
Let’s look at an example of a completed form. Let’s have some fun and play around with a nursery rhyme. In this case, let’s use “Little Miss Muffet.” Here it is to refresh your memory:
Little Miss Muffet sat on a tuffet,
Eating her curds and whey,
Along came a spider who sat down beside her,
And frightened Miss Muffet away!
We’re going to expand on the story elements here and turn it into something more current. Let’s say Little Miss Muffet has just read Sheryl Stein’s book Lean In and she wants be more of a leader. She doesn’t want to be frightened.
We also want to add more modern touches. So, let’s dump the curds and whey, because hey, dairy is hard to digest. And what is a “tuffet” anyway? It’s kind of a puffy footstool.
Let’s put Miss Muffet at a nice outdoor cafe, and she’s eating a delicious acai berry bowl when along comes this spider. What is he really doing there? Could he really be there to pass on the secret combination to the Mother Goose Nursery Rhyme Vault?
Here is my version of the MSP:
(Click the image to see full size)
(Note: Newsletter readers will have to
click through to the post to see the image.)
With all of that information, you can see how the scene is set up, and from here on in it almost writes itself. That is one of the benefits of using this form.
You do all of your experimenting here, add all the details, ideas, back story on this page. Get all those possibilities out of your brain, and then write the scene. You may not use all of these details in the final rewrite. What you use is up to you. Now you can concentrate on really making your scene pop off the page.
I hope you find this helpful. I want to take a moment and thank Jami for being such a generous hostess and for providing so much great information in her blog. I’m honored to have earned a spot here. If you have any questions, feel free to find me on Facebook or Twitter.
*****
 Rachel Funk Heller began her career as a journalist and worked as an independent television writer/producer for over two decades. She is a former CNN producer who worked in both the Atlanta headquarters and the Washington D.C. bureau. She is the author of The Writer’s Coloring Book® available at writerscoloringbook.com.
*****
 A unique writing guide for novelists, screenwriters, and playwrights that provides a visual playground for both sides of a writer’s brain: the passionate dreamer and the rational organizer. This is not your grandmother’s “how to write” book.
The worksheets and exercises help you create complex, multi-faceted characters in engaging, stay-with-you-forever stories. The exercises in The Writer’s Coloring Book® allow you to create sophisticated and deeply layered plots no matter what genre you’re working in.
These highly visual exercises allow you to see all your story elements before you write that first draft. And you can use them to trouble-shoot a project that needs help.
*****
Thank you, Rachel, and thanks for the Little Miss Muffet laugh! I love finding new tools that I can try when I revise. I especially love the idea of thinking about what we want to get across when we revise, from subtext to sensory information, because revisions are the perfect time to add those layers to our story.
I’ve seen (and probably suffered from this myself) authors revise to fix one issue, and instead they introduce several new problems. Often those problems are the result of focusing on the specifics of the initial feedback or feeling of what might be off, and therefore losing sight of the big picture goals for the scene and how it fits into the overall story.
So a process where we capture the purpose of the scene and all the specifics we want to keep, expand, or add sounds like it could be just what we need to help us avoid introducing new problems. *smile*
In addition, this worksheet gives us a great snapshot of all the things we’re supposed to emphasize in our writing:
- sensory information,
- goals and obstacles (conflict),
- moving the plot forward, and
- showing our character’s journey.
The next time I have a tricky scene to rework or one that feels flat, I’ll definitely be giving this a try. Thank you so much for sharing this with all of us, Rachel!
Have you struggled with knowing how to start a revision? Have you ever made things worse or introduced new problems when revising? Do you have any additional tips for how to avoid that issue? Do you think this Master Scene Profile might help you come up with a revision plan? Do you have any questions for Rachel about the MSP or her Writer’s Coloring Book?
(P.S. Don’t miss my 5th Blogiversary Contest!)
Pin It
THIS IS AWESOME!!!!
Great information, truly great, and I love the worksheets. And I can’t wait to get my hands on the book!!!
And, yes, I’ve had instances where revisions have made me cry. When I got my agent she asked me to revise my contemporary novel. I needed to take out a character’s POV. She was a secondary character and the only other person in the novel with her own POV besides the hero and heroine, which was pretty ridiculous since her internal scene only consisted of 5 pages.
I ended up taking her out of the story all together and ended up ADDING 30,000 words to the novel because of it. It was hard and time consuming, but it’s a WAY better book now because of that 🙂
Thank you for your wisdom!!!
Tamara
Aloha Tamara,
That’s the thing about revisions, they are gut-wrenching to think about, but so worth it in the end. I had a version of my novel, thought it was done, done, done, until someone pointed out what I thought was a clever plot twist, but it turned out to make no sense whatsoever. I had tear the whole book apart. That’s when I came up with this form, to help me make sense of what I needed to do. Hope it works for you too.
Hi Tamara,
Yes, every time I’ve made a big revision, the story has come out so much better for it. So it’s worth it to learn how to revise and find the determination to do so. 🙂 Thanks for the comment!
I have a hate/hate relationship with revisions!
I’d actually been doing something similar to the MSP in Scrivener by adding comments to the scenes but this worksheet is so much better! At the moment I’m stuck in the middle of the second draft, adding, cutting, and rearranging pieces. Once I’m done with that I shall be taking full advantage of your sheets. Thank you 🙂
Aloha Lara,
I use Scrivener too and I made the first version of the MSP in word, copied and pasted it into Scrivener and made it into a template. That way I could fill out the form and add it to the folder where the original scene lived in my Scrivener binder. I’m thinking I might make a word version available for Scrivener users to do that too. Good luck.
Hi Lara,
LOL! at the hate/hate. 😀 Good luck with your revisions, and thanks for the comment!
Excellent timing. I’ve been struggling to revise a short story and I think this will be very helpful. Me and short only work when it comes to my height so this will work nicely to make sure each scene has the most impact and that I don’t put in anything unnecessary.
Thanks so much ^^
I don’t write much short fiction, but what I like about this form is it gives you a place to set up your “wish list” for everything you think you want in the scene. You may use it all, you may use only a few items, but at least you have one place to write it all down. Good luck with your piece.
Hi Davonne,
I am forever going over word count, so I can relate. 😉 Good luck with your short story, and thanks for the comment!
This looks like a great revision tool. Thanks for sharing, Rachel and Jami!
You’re welcome, Denise! 🙂 I hope it helps!
Oh how I love worksheets and templates, especially ones that are such valuable tools for my writer’s tool box! Thank you!!
Great stuff!
Hi Ginger,
Ditto for me too. 😀 As Rachel pointed out, there’s just a different kind of mindset with worksheets that changes what kind of work it feels like. LOL! Thanks for the comment!
This is amazing! Will definitely be trying this out for my next book! 😀
Hi Tamar,
I’m so glad I had the opportunity to share Rachel’s worksheet with everyone. 😀 Thanks for the comment!
How timely! I finished the expanded redraft of my stage WIP this week and will be starting the rewrite of my novel WIP this coming week. Avoiding tears sounds good 🙂
Hi Deborah,
LOL! Yes, avoiding tears is usually a good goal. 🙂 Good luck with your rewrite, and thanks for the comment!
[…] If you’re looking for help with an organized path through the revision process, author Jami Gold recently blogged about it here. […]
I used to balk about doing this sort of planning before writing or editing, but I can see now how helpful it is to spend a few minutes planning out your process. Thanks for the resource, Rachel!
Hi Julie,
I know what you mean–for my last big revision, I came up with 2 pages of bullets to fix, and just having that list helped a lot. 🙂 Thanks for stopping by!
Hey Julie, I’m so glad you stopped by and that you find the MSP helpful. You can also use these to plan a new project if it is a very plot heavy project. Kinda like an outline on steroids.
No need to respond Rachel. I’m a reader, not a writer.
I enjoy reading Jami’s blog to better understand what goes on backstage during the creative process so I can be a more thoughtful beta reader or simply be a useful reviewer on Kindle or Goodreads.
I imagine mentally – or actually – using the scene profile when I read a scene and find it lacking, but I can’t figure out what is missing. Filling in the profile should let me figure out the gaps in my mental (beta read) movie, gaps the author might want to fill in.
Anyway, thanks for helping creative people create. Jon
Hi Jon,
Aww, thanks for the kind words! You’re right that one of the hardest things (in any endeavor, not just writing) is figuring out what’s missing. I’m dealing with an edit now that been horribly difficult because I don’t have a good handle on what I need to add or fix. Thanks for stopping by!
Jon, you are not just any reader, you are a thoughtful serious reader, and as I writer I salute you. You are the kind of person I think about when I write. I want to make sure that there is enough information to set the scene, and yet also leaves openings for your own imagination to fill in the blanks and draw your own conclusions. Thank you so much for your comments.
Rachel, I bought your book immediately after reading this post. I had just completed a structural edit, removing an entire subplot and using Jami’s Romance Beat Sheet to beef up the rest. I was dreading doing the content edit, and then saw this. Seriously, this sheet is amazing. For me, having to step away and summarize the goals of each scene made it clear which scenes were weak or needed work, without even having to re-read them. The sensory part made me work to include senses other than sight (I’m HIGHLY visual) or sound in the scenes to make them more realistic. One scene I particularly struggled with, and could tell before reading it that was weak and could easily be combined with another scene by filling out the MSP. The rest of your book is awesome though! I don’t know why, but your concept of societies really resonated with me, and having them be the source of conflicts sparked so many linking scenes. The shadow exercise was like a bomb going off in my head. I’ve done numerous in-depth character sketches before, but somehow this exercise, the conflict between ego and shadow, the yearning and conflict of societies on the characters, all summarized on one page, in color, just clicked for me. So I can’t thank you enough for your work on this book, even though I feel like I’m going to be buying stock in colored pencils and Sharpies now :D.
Rona,
THANK YOU so much for taking the time to post this. I can’t tell you how great this makes me feel! What you have just experienced is the entire reason why I wrote the coloring book the way I did. When I discovered the whole concept of “societies” I thought to myself that this would be so helpful on so many levels. You have totally made my day and confirmed the fact that I was not bat-s**t crazy when I wrote the book! Congratulations on your super charged creativity. Have fun and best luck to you in your writing career.
Hi Rona,
Yay! I’m so glad you found this helpful! 🙂
I love sharing resources, and Rachel’s worksheet was a perfect fit. Your explanation of how it worked for me makes me eager to try it myself. 🙂 And LOL! at your desire for colored pencils and Sharpies. Thanks for sharing your experience!
[…] writers have to face editing and revision. Rachel Funk Heller explains how to revise with a Master sheet, Jordan Dane describes his rolling edit process, and Clare Langley-Hawthorne discusses how to […]
[…] back from my vacation break, and I want to give a humongous shout out to all my guest bloggers: Rachel, Tamar, Rhoda, and Amy. (And a bonus shout out to Kerry, who filled in ahead of time to give me a […]